Do you enjoy growing Houseplants? Do you recognize this plant? Scroll down through each of the photos to watch as tiny buds grow, change and become a lovely and unusual hoya plant in bloom.
What is a hoya?
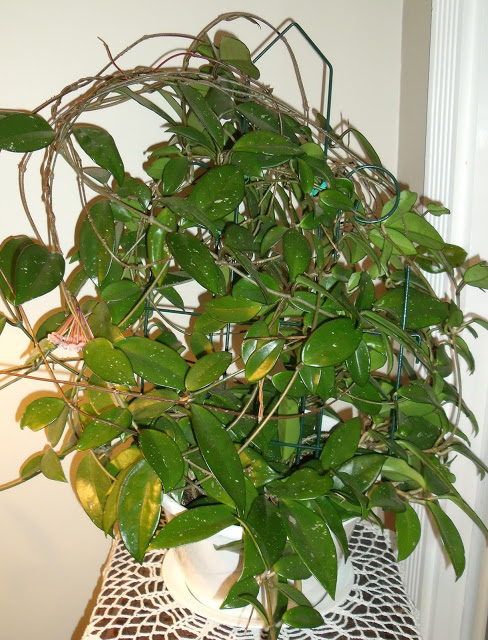
My plant is a hoya, also called waxplant, waxvine or waxflower. It is a tropical plant native to Australia, the Southern Pacific, and Southeast Asia with curving vines covered with waxy leaves. A hoya is a succulent. They have thick, leathery, leaves and blooms that are borne in rounded, upsided-down clusters like umbrellas. Many hoyas are fragrant.
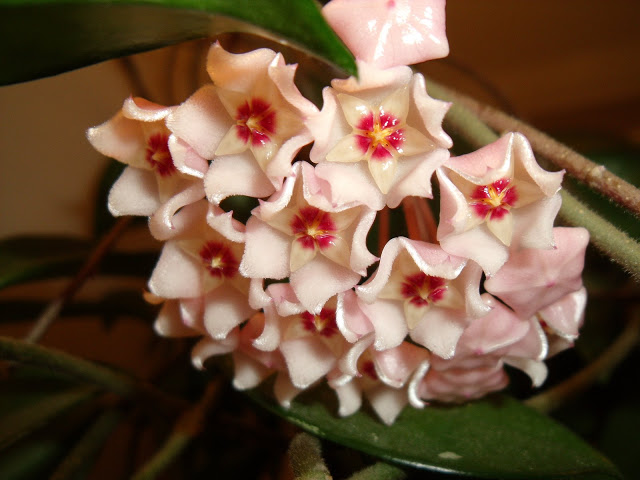
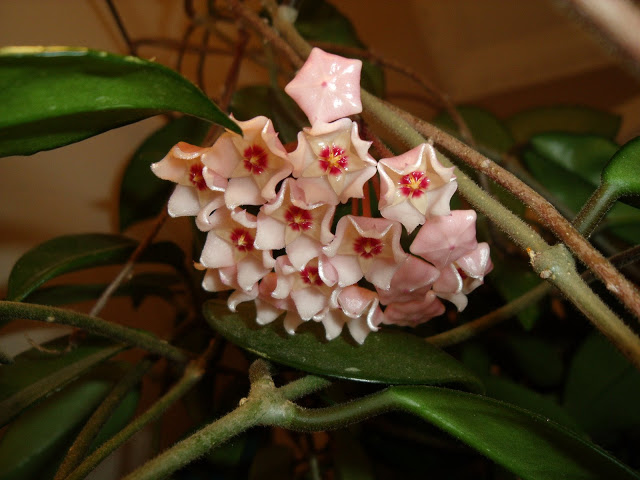
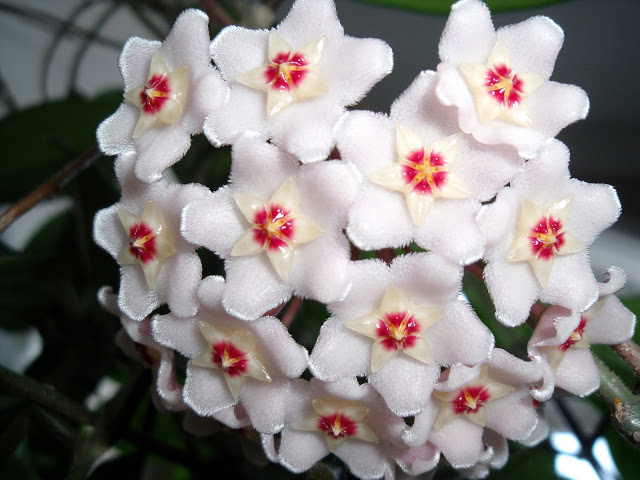
Hoya plant in bloom
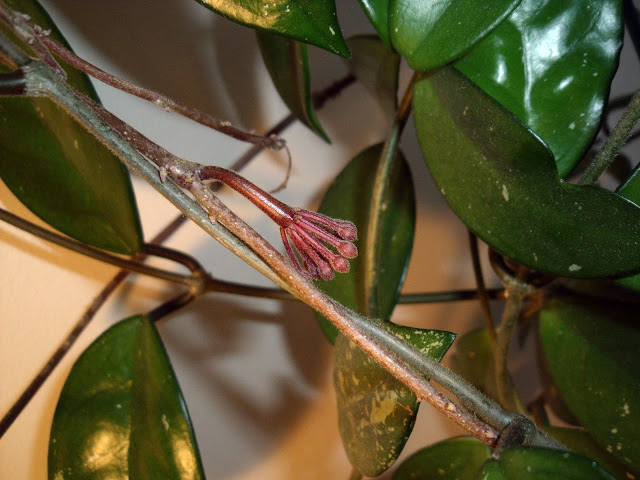
I photographed the stages as the hoya plant forms its unique and beautiful flowers beginning with the tiny group of buds I spotted among the leaves on my Hoya plant. Watch as it develops and opens to a very unique blossom.
Three days later after I first saw the buds growing from one of the stems, you can see they have grown larger and wider.

Two days after that the five points are more pronounced.
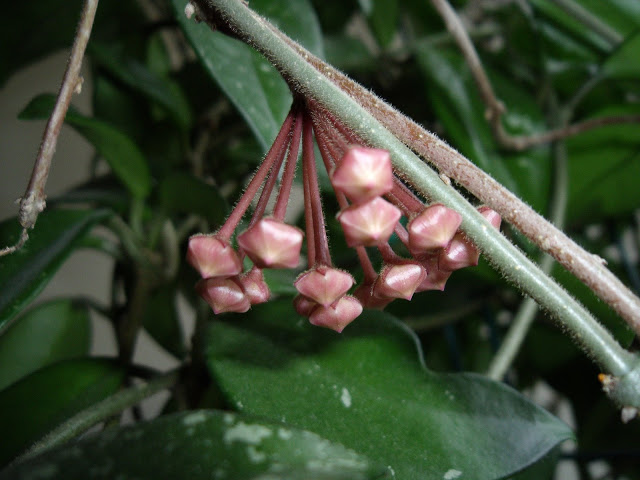 After two more days they begin to take on a waxy appearance.
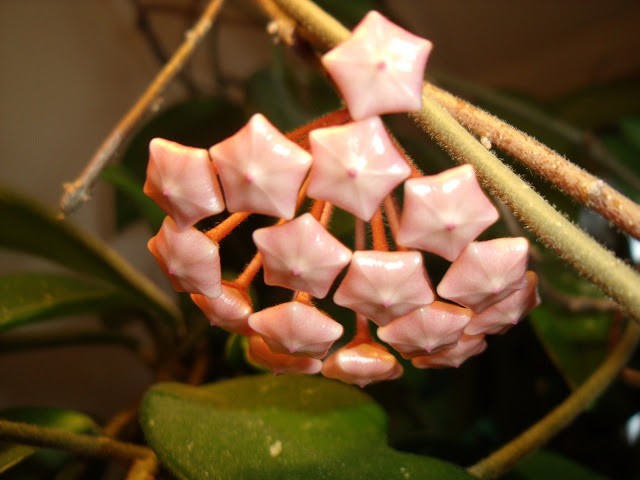
Four days later each five-pointed star becomes bumpy.
And finally one day later each tiny star bursts open revealing lovely inner star.
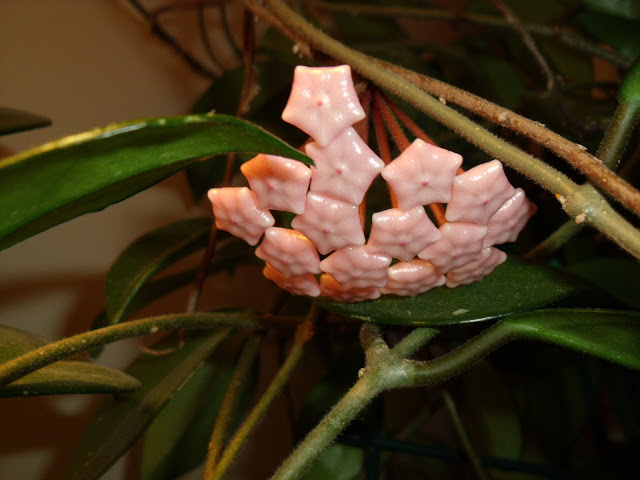
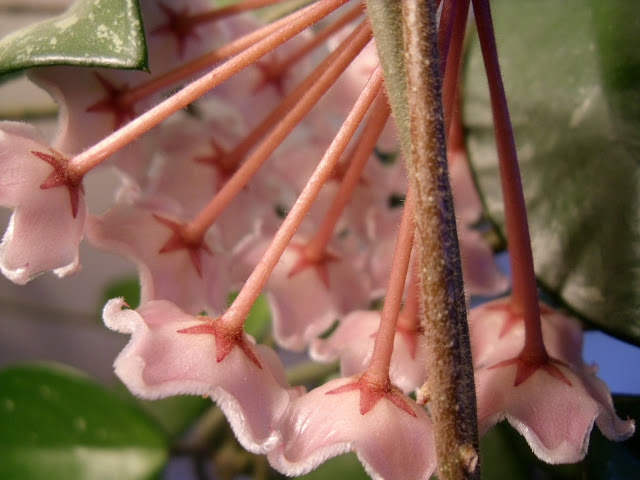
Beautiful hoya plant in bloom
A few days later, this how the hoya looked.

Looking closely, the flowers are textured and covered with tiny hairs. Above the outer fuzzy layer is another star that is waxy with a center of color.
Across the Hoya genus, each umbellate flower cluster emerges from a single spur — that is, a peduncle that grows from the axil of the leaves and stem. The spurs bear repeat blooms, and should not be removed. The buds are oddly flat-topped, like textured candies, and each flower typically includes not just one star figure but two: the petals and the corona, which together give these miniature blossoms beautiful depth and dimension.
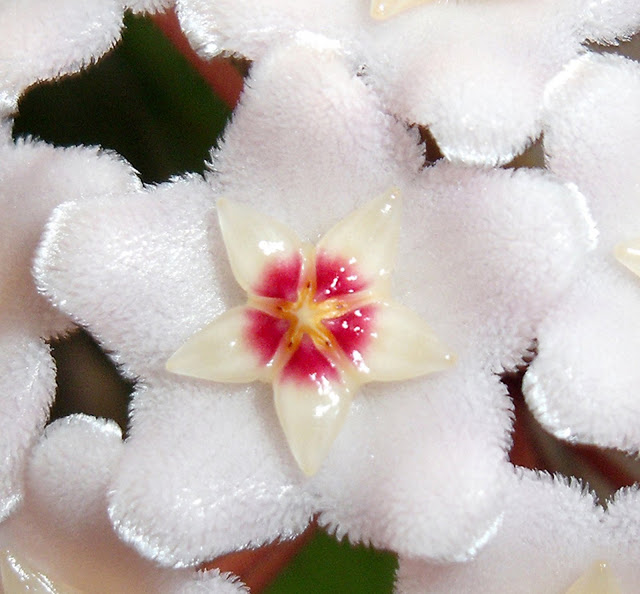
The flower is fragrant too.
How to propagate hoya
There is more than one way to propagate hoya but I am sharing my most successful method to root my cuttings.
Water method
- Make an angled cut using clean, sharp pruners or scissors 4 to 12-inches in length. Take the cutting from softwood.
- Place the cutting in a container of water keeping the bottom node immersed (and the roots that begin to appear). Don’t submerge the whole stem in the water.
- The roots start to appear in about 4 weeks.
Soil method
- When rooting in soil, take shorter cutting that are have 1, 2 or 3 nodes at the most and strip off all the leaves except those at the very top.
- You can also root stem cuttings in a mix formulated for propagation which is very light so the new roots can easily form. Dipping the ends of the cuttings in a rooting hormone before planting can be helpful. Dip the cut ends into rooting hormone and inserting into the soil mix deep enough that the lowest set of leaves is right above the soil line.
- Until their roots develop, the cuttings have no way to replenish the moisture escaping through their leaves. A clear glass jar over the container, or clear plastic baggie draped over, creates a temporary greenhouse to provide necessary humidity. Lifting the jar or plastic every other day allows carbon dioxide to reach the cuttings for photosynthesis.
- Cuttings typically form roots within three to four weeks. The first leaf shoots usually follow within a month or six weeks. The complete transformation of your cutting into a 6- to 8-inch leafy plant requires from five to 11 months.
Tips for growing and caring for a hoya houseplant
- Hoya plants make great houseplants.
- Hoya do well with bright indirect light, like a north-facing window.
- Keep soil evenly moist in spring and summer, but allow it to dry in the winter, with just enough so the leaves won’t shrivel.
- Humidity in your hoya habitat should be at least 40 percent. This can be achieved through regular misting with a spray bottle.
- Apply a balanced fertilizer only during spring and summer, the active growing season.
- Hoya prefer to be pot-bound and will flower more vigorously.
- Cooler temps are okay during the winter but make sure they don’t drop below 50. The plants enjoy the warm temperatures of the spring and summer growing season.
- Do not remove spurs after the blooms have faded. That’s where the next round of flowers will blossom. Allow faded flowers to fall off naturally.
You might also like…
 Each issue of our Newsletter is timely and helpful and jam-packed with food, crafts, occasional DIY, gardening and faith resources. Relevant and seasonal posts to inspire and guide you with current trends. Available only to those who request it, so please accept our invitation to stay connected and join the Grateful Prayer Thankful Heart community. Just click the subscribe button below.

So cool – I have never heard of this plant before. Wow. I love the progression.
Just noticed this bloom on a plant in my house recently it was on a glass shelf and it spread out in a perfect circle of stars ,.. really cool effect
Chris in OS, Wash.
Hello Molly, Thanks for you growing hints! Since this posting, my plant had grown substantially. I keep twisting the new growth around the plant and it is now like a small bush. Just recently I have noticed abundant growth. I am so anticipating a new bloom period!
Thank you for your visit and comment!
Kindly, ldh
Hi,
I couldn't help but comment on your lovely photos. Your Hoya carnosa is a lovely specimen. They prefer bright indirect light, so you have it a brilliant position. You are right to let the soil dry out almost completely between waterings. An occasional misting with weak fertiliser during the growing months will help promote more umbels of flowers. They also flower more profusely when pot-bound, so don't rush to repot it!
Good Old Mother Nature!
Kind regards,
Molly
(Molly's Tropical Plants)
So thats a Hoya plant…I had one once upon a time and the blooms are lovely, so unique. I was having a very bad allergy year though that year and the fragrance of the flowers did me dirt…grin.
Wow, what an amazing series of photos and a beautiful plant. Thanks for visiting my blog, glad you enjoyed it.
That is such a gorgeous plant! Who would dream that is how it would bug? Thanks for sharing!
Thanks all, for your sweet comments!
Sharon, I lightly water once or twice a week, but lately have been watering a bit more. I’ve read they should be allowed to dry out between waterings. I have looked closely and found several tiny sprout-like growth along the vines. They could do nothing, become a leaf or maybe… another blossom! I look each day and there is very little change, but I am hopeful 🙂
I have a hoya too. It seems to have stopped blooming for me. They are beautiful. Any Ideas would be appreciated. How much do you water yours? I was also picked by Bella. I ordered her wrist warmers and am teaching myself to crochet. LOL Sharon
Oh WOW…that is lovely. Thanks for the great pictures of the stages.
Mrs.H,
I LOVED this! 🙂 It was so neat to see the beautiful flower develop in stages!! Isn’t God’s creation marvelous?! 😉
Hope you are having a wonderful day, dear friend.
Love in Jesus,
Miss Jen
I love the stages. I’ve not seen that before – how unique and beautiful they are.
I love the pictures you took of the plant in all the stages leading up to the beautiful blooms!!! Great job!
This is a gorgeous plant! Thanks for sharing the pictures.
I always loved to see my grandmother’s tulips and daffodils bloom in the early spring. Thanks for sharing the amazing pics!
Karen
I remember my Grandma had one of those. We didn’t know the name so we called it a matchstick plant. They are very interesting plants ~ the flowers look like wax.
Thanks for the memories!