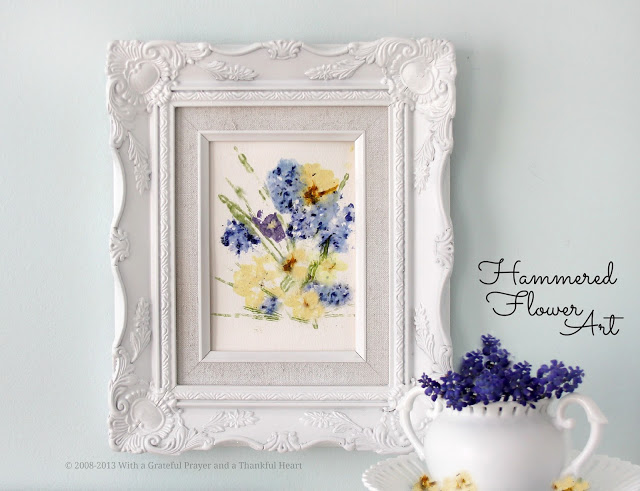
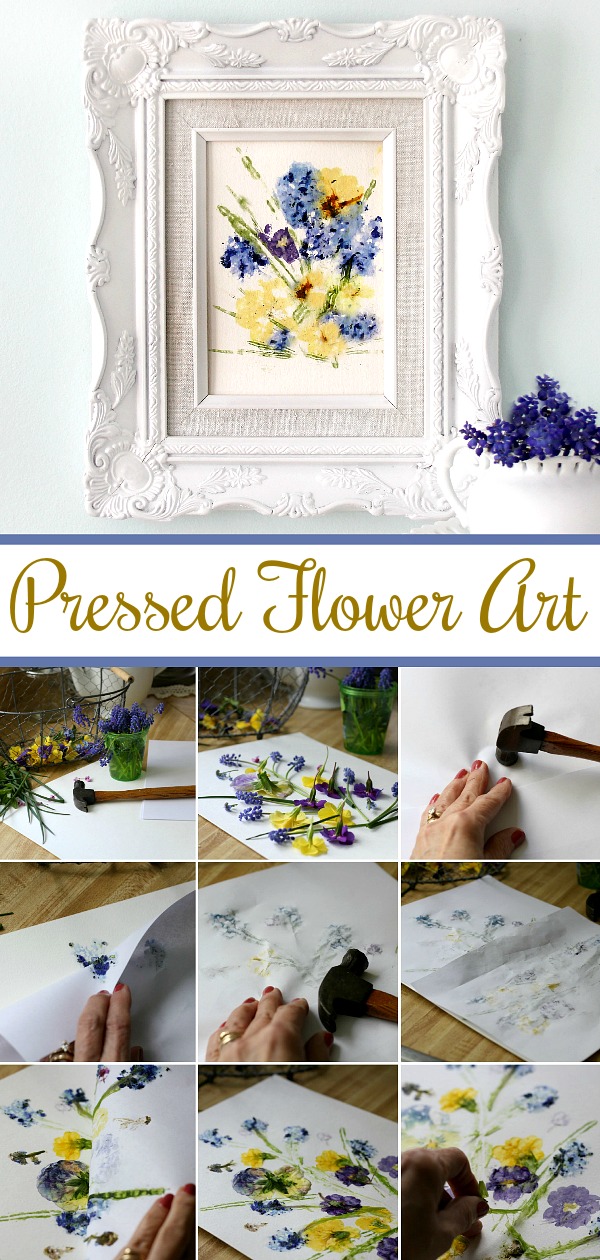
It really warms a heart when your little granddaughter hands you a single yellow dandelion with the sweetest, cheesiest smile on her face. Then big sister offers a fistful of grape hyacinths plucked from beneath the trampoline. Preserving spring and their thoughtful gift inspired this project of hammered flower art.
I knew just what I would do to preserve these springtime gifts. Recently I saw a post by Elise @Grow Creative, making art work by pressing the dye from flowers onto paper.
Preserving Spring by Pressing
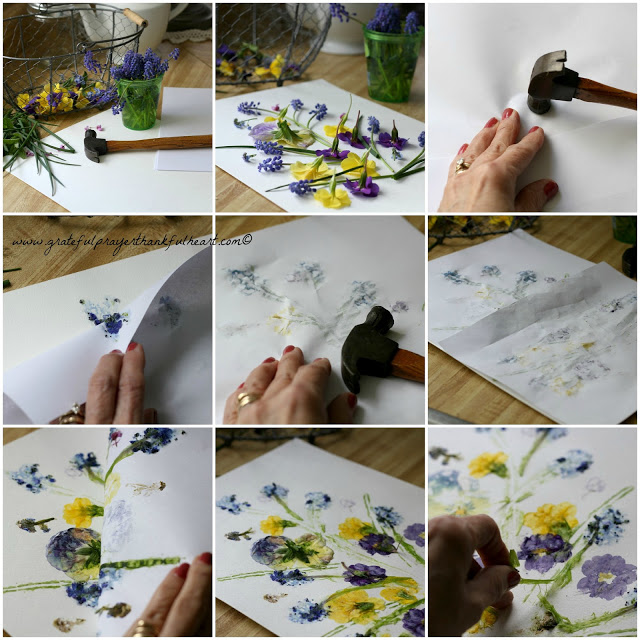
I had to do more than press to get the colors from the flowers onto the paper. So, I pulled out my ancient hammer and made a lot of noise!
Hammered Flower Art

How to transfer color
- I used heavy weight watercolor paper. Since the sheets were large, I cut several to 5-inch x 7-inch.
- I also gathered blossoms from the only flowers blooming in my yard ~ that included 1 pansy and primrose blossoms in purple, yellow and white. I cut some grass blades and even some chives from the herb garden.
- After arranging the flowers, face down, onto the paper, I covered them with plain computer paper.
- Holding the paper with one hand, I pressed and rubbed over the flowers with my fingers and thumb, carefully lifting the computer paper to check the transfer of color. The grape hyacinths squished easily but the other flowers had to be pounded with the hammer to get significant color from them.
- I got very faint impressions from the green grass, but the chives produced a bright green leaf.
- When all the pressing and hammering was done and the computer paper discarded, there were remnants of flower that needed to be lifted away. After allowing to dry a little, I carefully removed any left-over flower parts.

you might also like…
 Our Newsletter is published once every three weeks. Each issue is timely and helpful, jam-packed with food, crafts, occasional DIY, gardening and faith resources. Relevant and seasonal posts to inspire and guide you with current trends. Available only to those who request it, so please accept our invitation to stay connected and join the Grateful Prayer Thankful Heart community. Just click the subscribe button below.

What a great idea! I've never heard of this. Makes a beautiful keepsake!
xo
Pat
Oh my, you are soo talented and soo very thoughtful with your dearest little ones! Thank you so much for showing us how to, I will do this when my lil'ones give me flowers! Have a very blessed Mother's Day!
FABBY
Awesome idea! I can't wait to give this a try!!
what a gorgeous affirmation of a sweet gift!
be warned: many flowers will follow . . .
Oh my goodness….your version of this is so so pretty! The pansy looks great in there and I love the frame too ! Thanks for linking to my tutorial!
I took a class on doing this once–yours turned out beautiful!
Veggies work also. I have an atc in my collection made of these kinda dyes. But like you discovered, they have to be hammered to release their color. Thank you for visiting my blog and commenting. Do you have anything you are grateful for today? I'd appreciate it if you would return and leave one. Thanks again!
I've never seen such but oh, how neat. I'll have to file this away for future use.
wow, that turned out really pretty. I tried this once but didn't have very good results and never tried it again.
What a pretty idea.
How beautiful and fun.
What a great way to preserve the 'pretties' our grandchildren give us. I love the way your art work turned out!
~Adrienne~