I am always looking for gift ideas that are personal and useful.
These durable bookmarks fit the bill for many occasions.
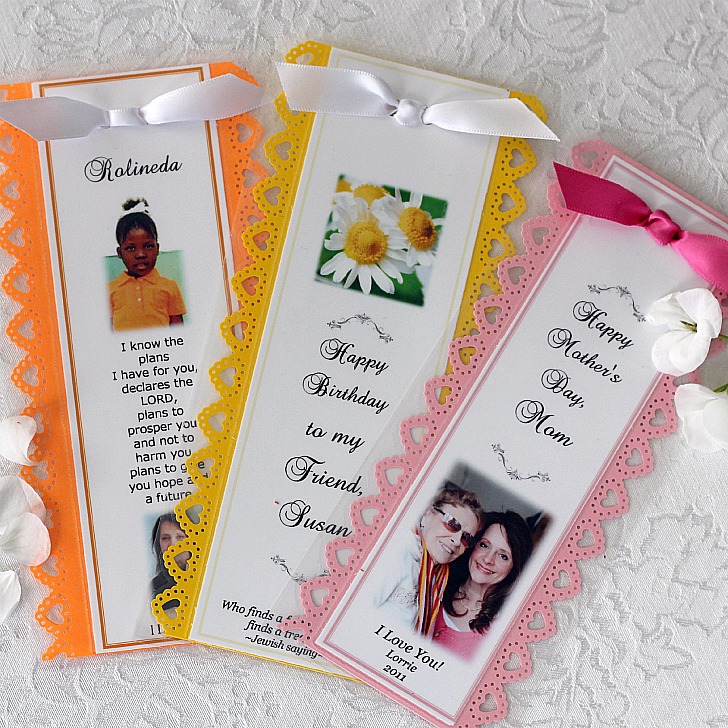
They are made as a Microsoft Word document, printed and glued to a piece of card stock that was edged using a paper punch, laminated at Staples and finished with a ribbon.
The possibilities are endless… Photos, monograms, quotes, and verses are just a few ideas that you can use to create a special keepsake.
Here is what I did, step-by-step:

1) Open New document in Word.
2) Adjust the right margin to the desired with of your bookmark remembering that the decorative border will add width to the finished size.
3) Click Insert Picture to take you to your photo files.
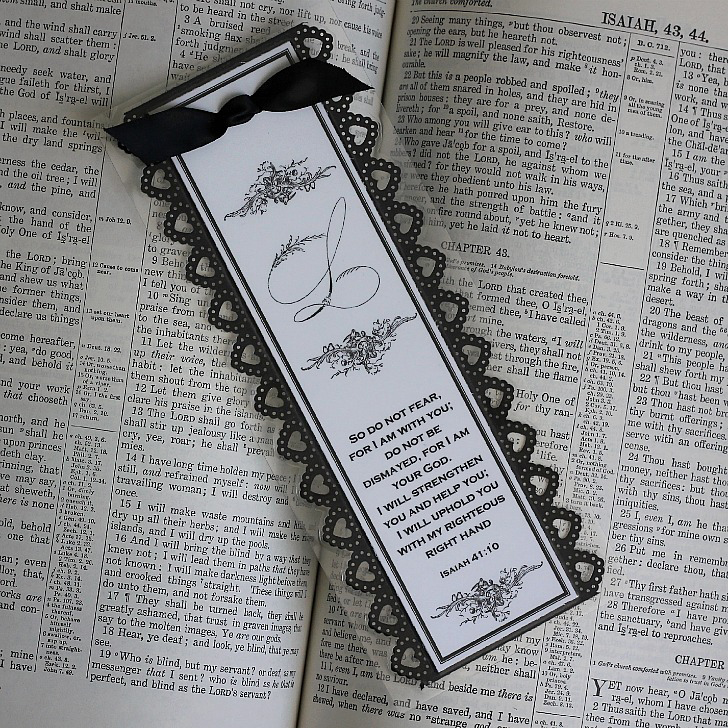
4) Choose your picture/image. Repeat if you want to add additional images as I did above. (I added the letter ‘L’ and then the scrolls above and below the letter)
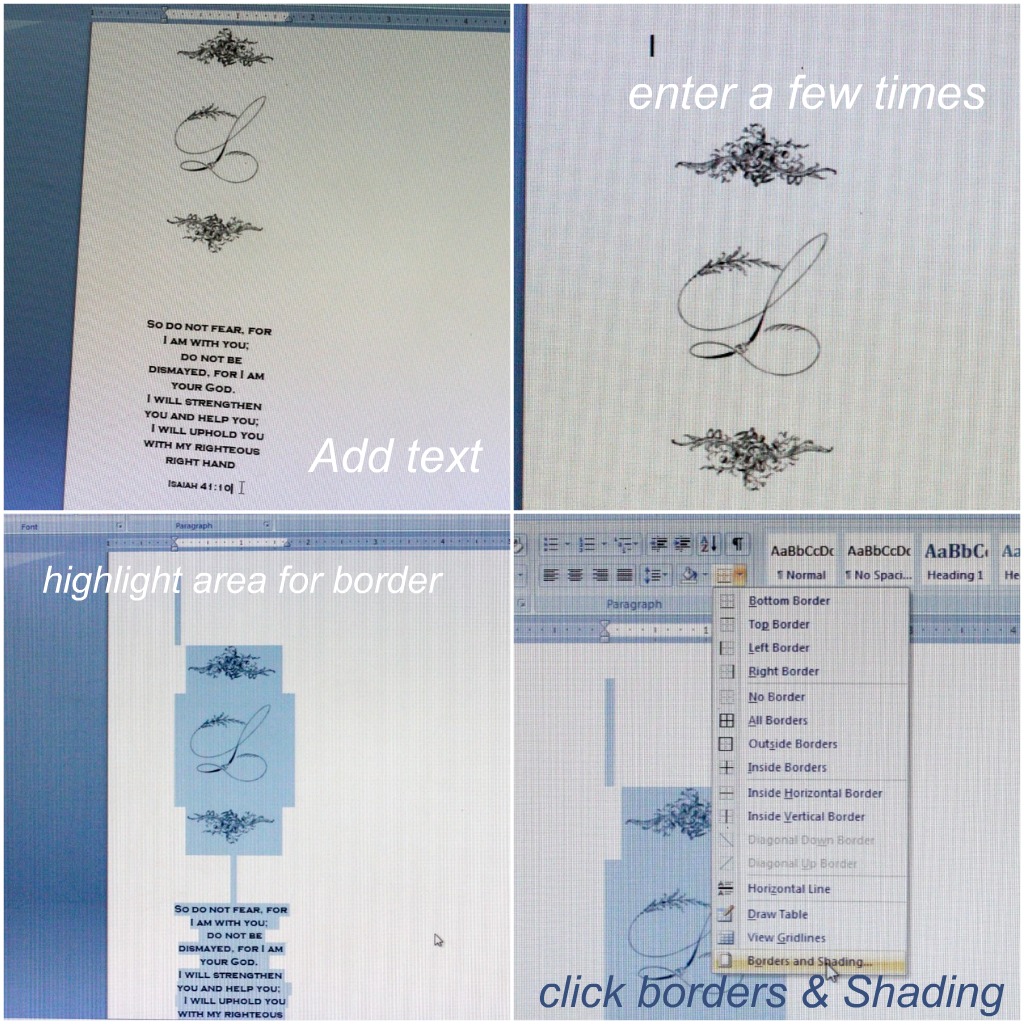
5) Add your desired text. It might be a favorite verse, quote or commemorate a special occasion or date.
6) I like to enter a few times to create an empty area at the top of the bookmark for a ribbon.
7) Highlight the entire design that will be encompassed by a border.
8) On the Toolbar, click the border icon and select Borders & Shading from the drop down list.
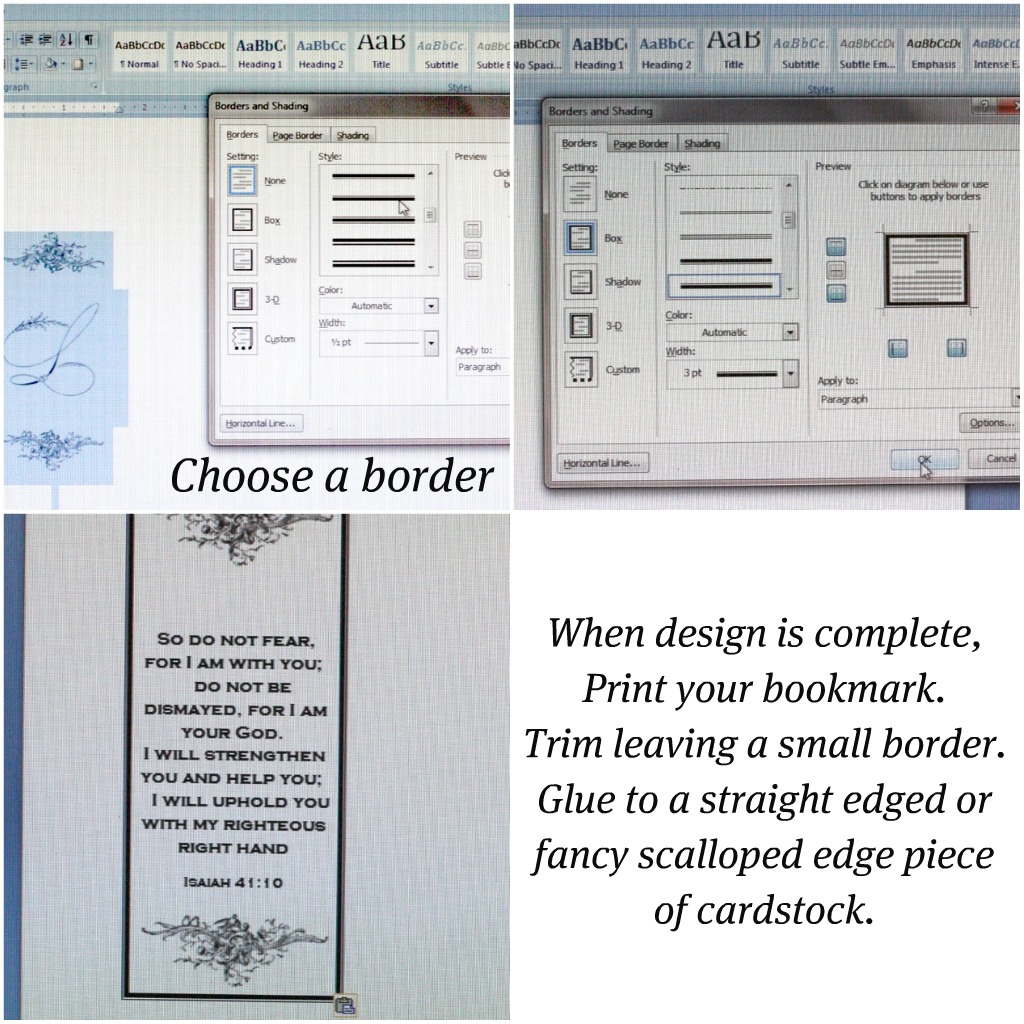
9) Scroll down to the style border you like best.
10) You can also pick a color by clicking directly below the Style tab. I like to use a color that matches the paper stock I will use to back the bookmark.
11) When everything looks just like you want, Print your bookmark. Trim leaving a small border.

12) Cut a piece of card stock in a complimentary color. A straight edge is very nice and masculine. I used a paper punch for the fancy scalloped edge for the girls.
13) Using a paper hole punch, punch a single or double hole for a ribbon. (I think a single ribbon is more masculine and the bow is more feminine.
14) At this point, the bookmarks can be finished simply by adding a ribbon. If you would like to make them more durable, take them to Staples to have them laminated. You can fit at least three bookmarks on a sheet and it costs $1.00 a sheet for lamination. A bargain, I’d say! After lamination, trim them apart being careful not to cut too close so the front and back piece remains sealed.
15) Finally, add a ribbon!
~*~
I used images graciously shared by Karen on her amazing site, The Graphics Fairy.
As you can see from my photo file, I save lots of images from this site!
Thank you, Karen!

These are so pretty!! I love the scalloped edges and you did a great tutorial too!
Thanks so much for linking to Think Pink Sundays!! (and for posting the button too!!! ) 🙂
Those are so pretty. Thanks for visiting my blog.
Thank you so much for sharing this tutorial. I have been thinking of making bookmarks for some gifts but hadn't given the details much thought. Your's are exquisite and I'm thrilled to have the directions.
~Adrienne~
What a great idea!
I love these..Im thinking my daughter and I could do this as a craft together!
Thanks for sharing this great tutorial, the bookmark looks lovely:)
These are beautiful and a great gift to a child or any reader. I personally love the one you made for your mom.
Wow! Those are amazing!
Xoxo
Charo
I have just discovered your website. I saw your project listed on The Graphics Fairy. What lovely bookmarks! I'd like to try making some too. Thanks for sharing how you did it, especially the computer part with pictures.
Hi Lorraine,
Thank you so much for visiting my blog..I'm so happy I found you on the Graphics Fairy…I just love your work and your Spirit-filled blog.
XO
they are beautiful!!!! ~thanks for sharing how you made them…I just love everything you make ;D ~have a wonderful week Love Heather
Beautiful. Several years ago, I made bookmarks, either on cardstock or cross-stitched, and gave them to just about everyone I know. Thanks for the tutorial here as these are so very pretty! Best wishes for a wonderful day. Tammy
Super idea! Perfect for some little gifts for special people.
Something I'll be able to do while recovering….except for the going to Staples part! : )
Happy Birthday to your friend Karen too! What a blessing to have a longtime friend!
These are totally beautiful!!!!
XO
Those are super bookmarks! They came out great! What a great idea, they make such a lovely gift!
My granddaughter once told me when we were coloring in her coloring book, "Wow! You're pretty good at this!" I would have to say the same about your bookmarks! I have always loved a pretty bookmark in my Bible.
Those are so very fun and what a blessing to give away.
Lorraine~ This is a wonderful idea…and I love bookmarks. I am saving this tutorial for when I have time to make some of these. GREAT little tuck-in for a card too! Thank you so much for taking the time to spell out the directions! xxoo Diana
Those are so pretty and a great gift idea. I love the border punch that you used. That black and white one is my favorite.
What a wonderful and creative
gift idea! I love it! Hope
I can do it.
Oh, I love these bookmarks! what a great idea for the end of year gift for the children and teachers too.
So happy I found you. Now I can get my creative juices flowing once again. I just need to see someone doing such a fab idea like this and I'm ready..
Thanks for sharing,
~Shirley
I'm keeping a star chart of talents and you have the most! These are such a sweet gift, much better than a card tucked away in a drawer. Thanks so much.
Oh I love this…thanks so much for sharing…now I am off to try it for my daughter and daughter-in-law.
These bookmarks are just adorable. They are so pretty and would make a wonderful gift. Thank you for the tutorial!
Very pretty, great for a farmer market craft. Elegant too.